A person rides a bicycle across a street intersection with traffic lights and a bus nearby.
Charlottesville Wedding
Society

Home | Admin Dashboard

Welcome back, Lisa!

Here's your business at a glance.

Upcoming Events

Reignite Your Vision

Attendees:
1
out of

Dana Kadwell reveals the journey of rediscovering passion and vision in your business, guiding entrepreneurs who feel stuck in the daily grind to reconnect with their journey to success and growth from her personal experience.

200 Ednam Dr, Charlottesville, VA 22903
Time:
9:00 am
-
11:30 am
Calendar icon with a checkmark inside, symbolizing a scheduled or confirmed date.
January 20, 2026
Free for Members
$
/Per Person

Attendees List

First NameLast NameBusiness
JaclynGriegerSalt and Pine Events
Download CSV

Attendees List

No items found.
First NameLast NameBusiness
Download CSV

Recent Members

Recent Vendors

Program Management

Tutorials & Guides

Admin Member Management

Manage Member Billing
  1. Open Memberstack Members
  2. Click on the name of the member
  3. Select 'Plans & Permissions' to view paid reoccurring current membership subscription plans and/or paid one-time plans
  4. Click the 'View in Stripe' button at the bottom footer to explore more detailed information related to the members Stripe Billing Details.

Note: If the 'View in Stripe' button is missing, the member is not correctly synced with their Stripe ID or the customer does not have a Stripe billing account. Visit Stripe Customers to manually check.

Remove Person From a Team
  1. Open Memberstack Members
  2. Click on the name of the member
  3. Select 'Plans & Permissions' to view team plan.
  4. Click Edit Team
  5. Identify the member from the list and click Remove

Note: Proceed with caution, removing team member can't be undone. Team owners can also manage their own team to remove and add members.

See FAQ How to Remove a Team Member

Guides & Help

How to remove or replace a team member

To remove or replace a team member in your plan, follow the steps below:

  1. Open the Manage Team Settings to view all your current team members.
  2. Click the red 'REMOVE' button to revoke team access and remove the member from your account.

To add a new team member to your plan, follow the steps below:

  1. Click the blue Copy button to generate your unique invite link.
  2. Share the link by pasting it into an email and sending it to your team members.
  3. Team members can click the link to either Sign In (if they already have an account) or Sign Up (if they are new).
  4. Once they've successfully joined using the link, you’ll be able to view and manage them in your team settings.

Note: You can only invite the number of team members allowed under your current membership plan. If you’ve reached your team member limit, consider upgrading your plan to add more members.

How to switch membership plans:

Switching membership plans can be done by you at any time.

  1. Visit the Manage Plan page.
  2. Review your current plan details.
  3. Scroll down and select a new plan that suits your needs.
  4. Click the button for the plan you want and proceed with the switch.
  5. Complete the Stripe checkout process to confirm your plan change.

Important Notes:

  • Any unused credits from your previous plan will be prorated and applied to your new membership price.
  • A detailed invoice reflecting the changes will be emailed to you after the switch.
  • All features included in your new plan will be activated automatically. To customize your settings or make changes, visit your Business Vendor Profile Settings or Manage Your Team as desired.

If you have any questions, feel free to contact Lisa at lisa@cvilleweddingsociety.com.

How to transfer team ownership to someone else?

If you work at an organization, there may be time you need to transfer ownership of your admin account to a new person. In order to accomplish this, please follow these steps:

I will no longer manage a CWS member profile, and I need to transfer team ownership and billing to a new CSW member:

  1. Visit your Account Settings.
  2. If you need to change the card on payment BEFORE transferring ownership, click Plans > Manage Plans to open the secure Stripe payment portal and change your payment details to the new card.
  3. Revisit your Account Settings and click Security
  4. In the 'Email' field, add the new email address of the person you are transferring ownership to and click save.
  5. Instruct the new person to visit the website to reset the password on the account. They will be sent a verification code to the new email address you set in step 4.
  6. The new member must now create or connect their own membership profile. Please email Lisa@cvilleweddingsociety.com to request a new member profile for the new team owner.

Important Notes:

  • Unless manually changed, Stripe Billing will continue with the same card and details on file.
  • The new team owner must create or connect their member profile before being able to use member-specific benefits such as event registration or the member profile tools.

If you have any questions, feel free to contact Lisa at lisa@cvilleweddingsociety.com.

How to unlock all vendor directory features:
If you would like to unlock all the premium features for your Business Vendor Profile, please upgrade your account to the 'Premium Membership Plan'
How To RSVP to Events

To attend an event, each member must RSVP individually. RSVPs are directly tied to your member ID, which ensures that only you can RSVP for yourself; other members cannot RSVP on your behalf.

How to RSVP:

  1. Visit the Upcoming Events page.
  2. Select the event you wish to attend.
  3. If you’re not logged in, click Login and sign in to your account. Otherwise, simply click RSVP to be added to the attendee list.
  4. You can view all events you’ve RSVP’d to on your My Events page.

Cancelling an RSVP:

If you need to cancel your RSVP, simply click Cancel RSVP on the My Events Page to remove yourself from the attendance list.

Important Notes:

  • You can only RSVP for yourself—RSVPs for other members are not allowed.
  • Each member must RSVP for events individually.
  • Unless otherwise noted, only CWS members are permitted to attend member-only events. In most cases, non-member guests will not be allowed.

If you have any questions, feel free to contact Lisa at lisa@cvilleweddingsociety.com.

How to send and receive member-to-member or user-to-vendor messages?

Messaging Features for Your Business Vendor Directory Profile

If your membership plan includes user-to-vendor messaging on your Business Vendor Directory profile, the public can send you business inquiry messages directly through your business vendor public profile.

  • Message notifications will be sent to the business email address listed on your Business Vendor Profile.
  • To receive inquiry messages, you must add an email address to your Business Vendor Profile.
  • Your email address will not be publicly displayed. Instead, notifications will be sent to you via email, and you can choose to respond directly to the sender.

Important Notes:

  • The email address associated with your membership account will not be used for your Business Vendor Profile. You must specify a dedicated business email in your Business Vendor Profile settings.
  • To receive member-to-member messages, other members can send direct messages via your member profile. These messages will be sent to your membership email address, allowing you to respond to the sender directly.

Privacy Assurance:

  • Your personal membership email address will not be shared publicly or with other members.
  • Members will only know your email address if you choose to reply to them directly.

Create New Event

Fill Out the Form to Create a New Event

To create new events, you will need to create a new Webflow CMS item for 'Events.'

  1. Go to Webflow > Open in Webflow
  2. You can use either 'Design' mode or 'Build' Mode (Build Mode is recommended for ease of use)
  3. Click Events from the left panel
  4. Click '+ New Event'
  5. Add the Event Details in the form

⚠️ DO NOT MANUALLY EDIT ANYTHING BELOW CMSID⚠️

Attendance and waitlist data linking happens during automation. If you manually edit these details, the automation will not run and the data will be off sync. Proceed to manually edit details carefully.

If a member requests that you add them to the list, it is best to encourage the member to log into their member profile and RSVP themselves to ensure automation occurs correctly.

If absolutely needed, you can 'login as member' and RSVP them on their behalf by visiting Memberstack > Members > (Click on the member desired) > Actions > Login as Member. This will allow you to log in their profile to manage details on their behalf.

Add Price to Event

Add a Ticked Price to Events

To add a ticket price in to any event, follow below:

Watch the tutorial video

  1. Go to Memberstack dashboard and click plans
  2. Click the '+ Add Plan' button to create a new plan.
  3. Select 'Paid Plan' and click 'Next'
  4. Give the plan a name, for example 'Social Event Fee'
  5. Add an option description
  6. DO NOT enable team accounts for this plan
  7. Click create plan
  8. Click the plan name from the list and click 'Prices'
  9. Click 'Create Price'
  10. Give the price a name, for example 'One-time Event Fee'
  11. Click 'One-Time'
  12. Enter the amount you wish to charge
  13. Optionally add setup fees or other charges using the 'Advanced Options.'
  14. Leave 'Expiration' blank unless you wish for this price to expire
  15. Click 'Create Price' at the top
  16. Click the three dot icon on the top right of the screen (Next to the black 'Install and Publish' button)
  17. Click the 'Copy Plan Id'
  18. Paste this plan ID in the Webflow Event form field for 'Stripe Price ID' for your new event

Stripe & Ticketing Tutorials

Add a Ticked Price to Events

To add a ticket price in to any event, follow below:

  1. Go to Memberstack dashboard and click plans
  2. Click the '+ Add Plan' button to create a new plan.
  3. Select 'Paid Plan' and click 'Next'
  4. Give the plan a name, for example 'Social Event Fee'
  5. Add an option description
  6. DO NOT enable team accounts for this plan
  7. Click create plan
  8. Click the plan name from the list and click 'Prices'
  9. Click 'Create Price'
  10. Give the price a name, for example 'One-time Event Fee'
  11. Click 'One-Time'
  12. Enter the amount you wish to charge
  13. Optionally add setup fees or other charges using the 'Advanced Options.'
  14. Leave 'Expiration' blank unless you wish for this price to expire
  15. Click 'Create Price' at the top
  16. Click the three dot icon on the top right of the screen (Next to the black 'Install and Publish' button)
  17. Click the 'Copy Plan Id'
  18. Paste this plan ID in the form field for 'Stripe Price ID' for your new event
Refund, Cancel, or Remove a Plan Manually

PLEASE NOTE: If a customer wishes to cancel their membership, they should do so themselves by logging into their profile, accessing the dashboard page and clicking 'Account Settings' to manage their subscription in Stripe directly.

Manually Refund, Cancel, or Remove a Plan

For situations that require a manual refund, follow the step below to manually refund, cancel, or remove a plan for a customer.

Revoke Membership Access

  1. You'll need to issue the refund in Stripe and revoke access to content in Memberstack.
remove_free_plan.gif
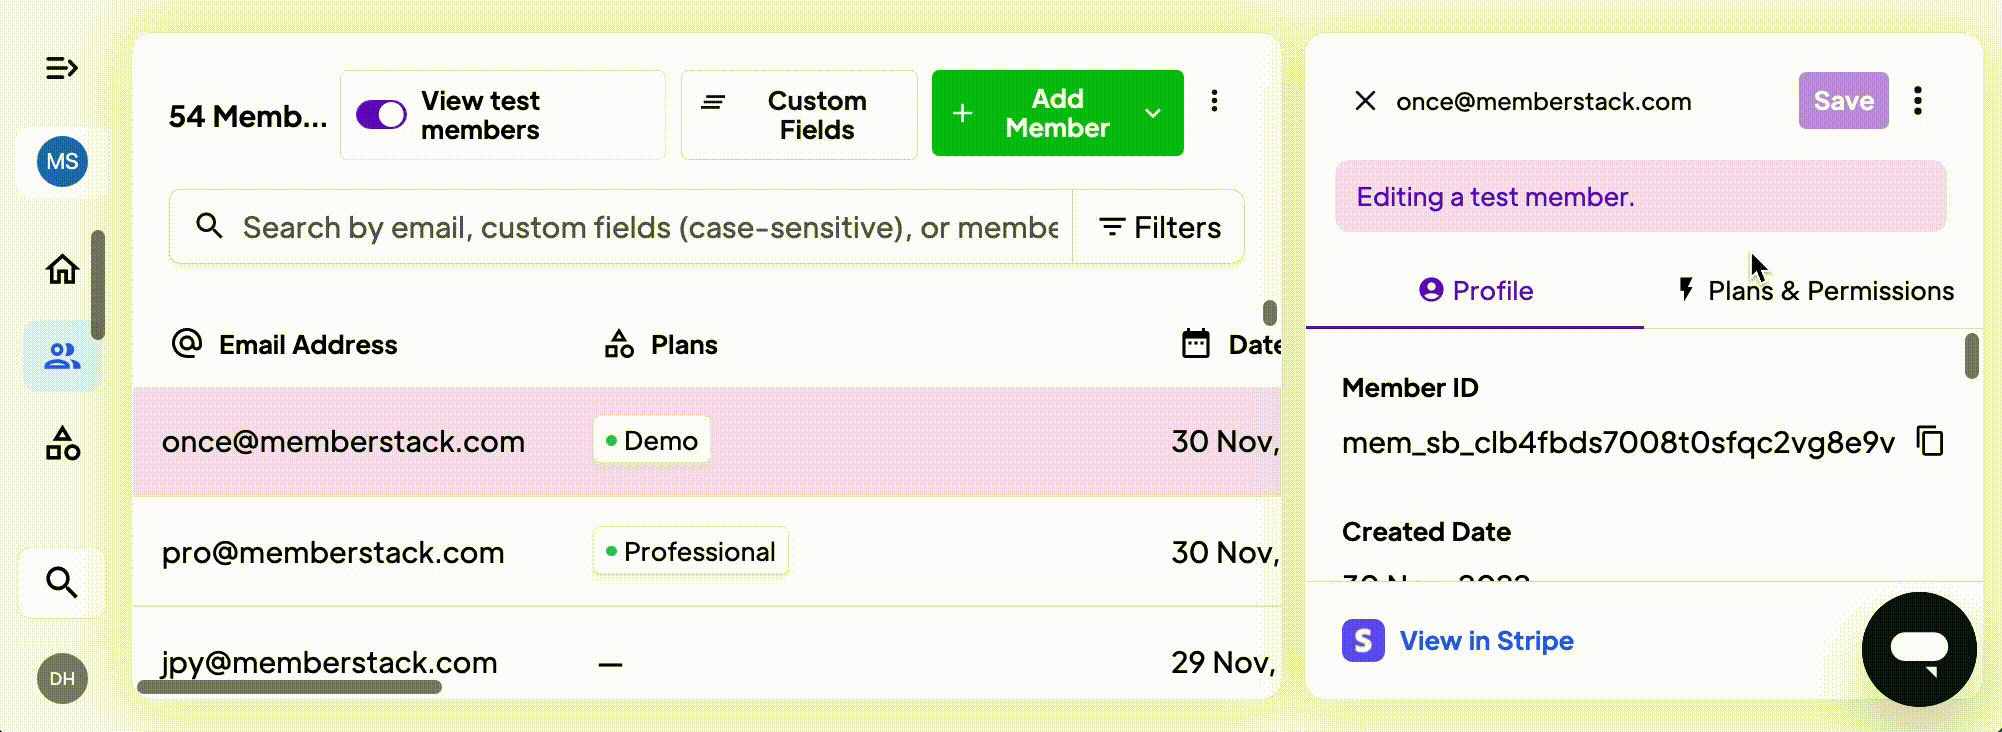
  1. Navigate to the Members page in your dashboard, select the member, click "Plans & Permissions," and then "✏️ Edit" the one-time plan.
  2. This will launch a confirmation modal, which you can use to remove the one-time plan. Enter plan name and press "Confirm & Remove."

Stripe Customer Portal with Memberstack